Introduction :
Generally, Java or Kotlin language is the default language which used in Android App development. The complex projects like image processing, machine learning, data science and AI based project is built by python language. Python is simple and easy to use language so you want to use python to create Android app in Android Studio IDE. Using Chaquopy in Android Studio IDE, you can use Python code into your Android application.
Chaquopy will link between the Java or Kotlin and Python programming languages in Android Studio IDE. It allows you to use both languages within the same Android project. In the article, I shall show you how to create Android app using chaquopy with python code in Android Studio IDE. Here, I have used python language with java to build the app using chaquopy.
What is Chaquopy :
Chaquopy is a plugin or SDK for the Android Studio IDE that combines Python language with Java or Kotlin in Android app. Chaquopy serves as a bridge between the Android Studio IDE and the Python programming language. It integrates the Python code into your Android application. It also allows you to use Python’s libraries within the same Android project.
Chaquopy allow you to call Python code from Java or Kotlin and vice versa. You can use various python libraries such as Matplotlib, SciPy, OpenCV, TensorFlow using chaquopy in android app. Using chaquopy, you can create data science, machine learning, image processing and more python modules into your Android Studio project.
About the application :
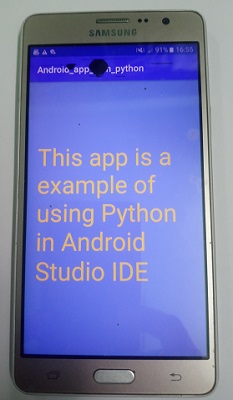
This is a simple app where I have used python in android studio by chaquopy. In the app, you can see a message display on the screen which is written using python. In MainActivity.java file, I call the python with two string arguments and the python code returns a modified string with those string arguments. Finally, the modified string will display on the screen.
Step for create the application :
If you want to build an app using python code in android studio IDE, you have to follow the below steps.
Step 1 :
At the beginning, open the Android Studio on your pc and download NDK from file-project structure of Android Studio IDE. Now, create a new project with empty activity. Give a name of the project such as “Android_app_with_python”. You have to check on legacy android.support libraries. If you do not know how to create Android app, you can follow my link. You have to install python on your pc. If you haven’t installed Python yet, you can download it from the official Python website.
Step 2 :
When the app will be built, open build.gradle(Project) file and add the below code in repositories.
maven { url "https://chaquo.com/maven" }You have to also add the following code in dependencies.
classpath "com.chaquo.python:gradle:13.0.0"After add the above code the build.gradle(Project) file look like below code.
// Top-level build file where you can add configuration options common to all sub-projects/modules.
buildscript {
    repositories {
        google()
        jcenter()
        maven { url "https://chaquo.com/maven" }
    }
    dependencies {
        classpath "com.android.tools.build:gradle:4.1.1"
        classpath "com.chaquo.python:gradle:13.0.0"
        // NOTE: Do not place your application dependencies here; they belong
        // in the individual module build.gradle files
    }
}

allprojects {
    repositories {
        google()
        jcenter()
    }
}

task clean(type: Delete) {
    delete rootProject.buildDir
}
Step 3 :
Then, open build.gradle(Module) file and add the following code in plugins.
id("com.chaquo.python")Now goto defaultConfig and add the following code after applicationId “com.example.android_app_with_python” and before “minSdkVersion 22”. The code will create a folder with the name “python”.
sourceSets {
            main {
                python {
                    srcDirs=["src/main/python"]
                }
            }
        }
After testInstrumentationRunner “android.support.test.runner.AndroidJUnitRunner” add the code. You have to change the path of python.exe file in your code. The python.exe file of your pc will be different than my code.
  ndk {
            abiFilters "armeabi-v7a", "x86"
        }
        python {
            buildPython "C:/Users/puskarjasu/AppData/Local/Programs/Python/Python39/python.exe"
        }
Now build.gradle(Module) file look like below code.
plugins {
    id 'com.android.application'
    id("com.chaquo.python")
}

android {
    compileSdkVersion 31
    buildToolsVersion "34.0.0"
    defaultConfig {
        applicationId "com.example.android_app_with_python"
        sourceSets {
            main {
                python {
                    srcDirs=["src/main/python"]
                }
            }
        }
        minSdkVersion 22
        targetSdkVersion 31
        versionCode 1
        versionName "1.0"
        testInstrumentationRunner "android.support.test.runner.AndroidJUnitRunner"
        ndk {
            abiFilters "armeabi-v7a", "x86"
        }
        python {
            buildPython "C:/Users/puskarjasu/AppData/Local/Programs/Python/Python39/python.exe"
        }
    }
    buildTypes {
        release {
            minifyEnabled false
            proguardFiles getDefaultProguardFile('proguard-android-optimize.txt'), 'proguard-rules.pro'
        }
    }
    compileOptions {
        sourceCompatibility JavaVersion.VERSION_1_8
        targetCompatibility JavaVersion.VERSION_1_8
    }
}

dependencies {
    implementation 'com.android.support.constraint:constraint-layout:2.0.4'
    testImplementation 'junit:junit:4.+'
    androidTestImplementation 'com.android.support.test:runner:1.0.2'
    androidTestImplementation 'com.android.support.test.espresso:espresso-core:3.0.2'
}
Step 4 :
When all code will be added, you have to “Sync Now” with net on. It takes some time to download necessary files in your project.
Step 5 :
After that, open Project in Project tab and goto app> src>main. Here you can see “python” folder is created otherwise you have to create a folder name as “python”. In python folder, create a file “pac.py” and paste the below code.
def main(A,P) :
  return f"This app is a example of using {P} in {A}"
Step 6 :
Now open the MainActivity.java file and paste the below code.
package com.example.android_app_with_python;

import android.support.v7.app.AppCompatActivity;
import android.os.Bundle;
import android.widget.TextView;

import com.chaquo.python.PyObject;
import com.chaquo.python.Python;
import com.chaquo.python.android.AndroidPlatform;

public class MainActivity extends AppCompatActivity {
TextView textView;
String A="Android Studio IDE",P="Python";
    @Override
    protected void onCreate(Bundle savedInstanceState) {
        super.onCreate(savedInstanceState);
        setContentView(R.layout.activity_main);
        textView=findViewById(R.id.text);
        if (! Python.isStarted()) {
            Python.start(new AndroidPlatform(this));
        }
        Python python = Python.getInstance();
        PyObject pyObject = python.getModule("pac");
        PyObject data=pyObject.callAttr("main",A,P);
        String getdata=data.toString();
        textView.setText(getdata);
    }
}
Step 7 :
At last, open the activity_main.xml file and paste the below code.
<?xml version="1.0" encoding="utf-8"?>
<android.support.constraint.ConstraintLayout xmlns:android="http://schemas.android.com/apk/res/android"
    xmlns:app="http://schemas.android.com/apk/res-auto"
    xmlns:tools="http://schemas.android.com/tools"
    android:layout_width="match_parent"
    android:layout_height="match_parent"
    android:background="#8E9CED"
    tools:context=".MainActivity">

    <TextView
        android:layout_width="wrap_content"
        android:layout_height="wrap_content"
        android:padding="20dp"
        android:id="@+id/text"
        android:textColor="#F8E115"
        android:textSize="50dp"
        app:layout_constraintBottom_toBottomOf="parent"
        app:layout_constraintLeft_toLeftOf="parent"
        app:layout_constraintRight_toRightOf="parent"
        app:layout_constraintTop_toTopOf="parent" />

</android.support.constraint.ConstraintLayout>
Run the application :
Using the USB cable (data cable), connect your Android phone to computer. Then, click the green “Run” button to run the app on your phone. After that, the app will be installed and launch on your device. You can see your app on a phone like this image.

Conclusion :
Finally, you have learned how to use python code in android studio. Now, you can create more complex android app using the python language. Thank you for visiting my site.


