Introduction :
The world of Android app development is very interesting for new developers. If you want to create your own mobile applications to bring your ideas to life, you must follow my post. You can build various mobile applications using the powerful and user-friendly Android Studio IDE.
In this article, I shall show you step-by-step guide to create a first Android app using an Android Studio IDE with source code. Here, I shall cover everything such as create a project, designing user interfaces, write code and run the app on a physical device (android phone) etc.
What is Android Studio :
Android Studio is an integrated development environment (IDE) by which you can develop different type of Android applications. It is provided by Google. It gives us various sets of tools and features to design, code, test and debug Android applications. Using Android Studio, you can build applications for any Android platform.
In this IDE, you can use various programming languages such as Java, Kotlin and C++ to write code. Here, you can design user interface using a drag-and-drop interface and also preview your app on different screen sizes and densities. There is an emulator in the Android Studio IDE where you can run your app on virtual devices. Using the debugger of Android Studio IDE, you can find and fix any error in your code.
Step for create first Android app on Android Studio IDE :
Step 1 :
To create an android application, you need Android Studio on your computer. At first, you have to download Android Studio from the official website and install it on your pc. You can follow the installation instructions for your operating system on the official Android documentation.
Step 2 :
After successfully install the Android Studio on your pc, open it.
Step 3 :
To create a new project click on “Create New Project”.

If there is a project open in android studio, then go to File -> New -> New Project.
Step 4 :
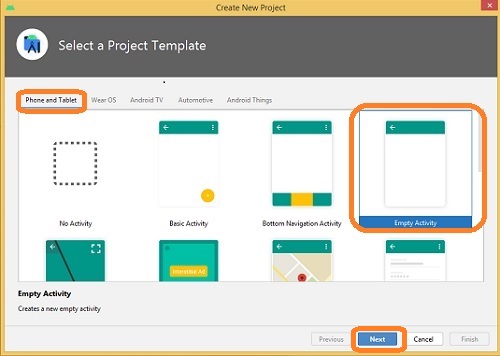
After that, you have to select “Phone and Tablet” in the project template. Here, you have to select “Empty Activity” and click on “Next” button.
Step 5 :
Then configure window will be open, Here you have to give a name for the project or app such as “My_first_app” in the name box. Here, you Keep the package name and location default. You can change the package name and location of the project. It’s time for selecting the language Java or Kotlin. Here, you can select java language for the project.
Then, you have to select the minimum SDK. Here, I choose API 22 Android 5.1 (Lollipop) as minimum SDK. After that, click on “Finish” button to create your project.

Step 6 :
The Android Studio IDE takes some time to create the project or app. After completing the project, you can see a basic project structure with important folders including the “app” module. The “app” module contains java code and resources of the project. Now go to app > java > com.example.my_first_app > MainActivity.java and double click on the MainActivity.java file to open it.

This is the main java file for your project or app. The onCreate method of the MainActivity.java file is the entry point of any project. You can add the necessary code to handle the app’s logic to respond to user actions or events. In your first Android app, you do not need to change in the MainActivity.java file.

Step 7 :
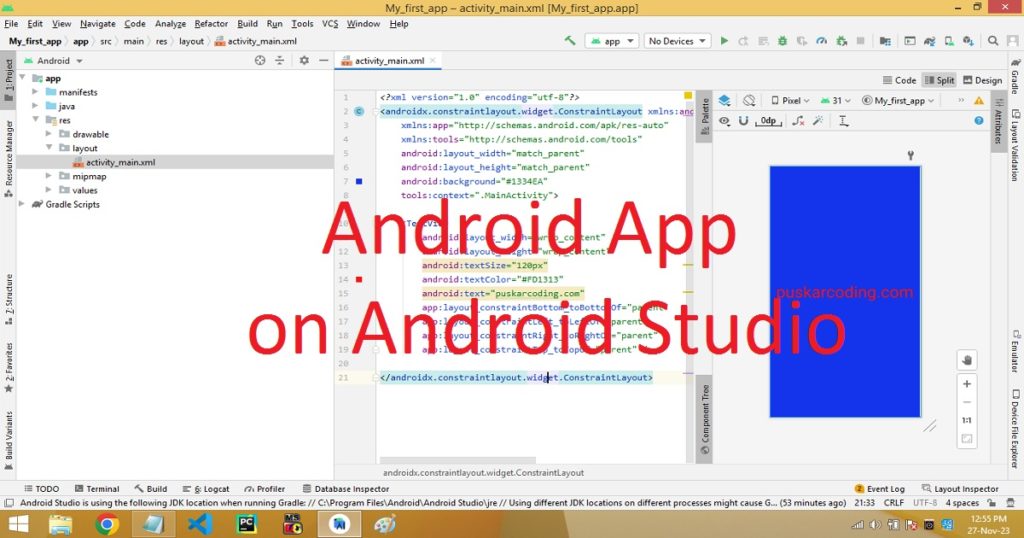
Then go to app > res > layout > activity_main.xml and double click on the activity_main.xml file to open it.

This is the XML file for the layout of the main activity of your project or app. You can design the user interface of the project using XML code or drag and drop of the visual editor. Here, I have changed the text and text color and the background of the activity.

You can copy the below code and paste in activity_main.xml file.
<?xml version="1.0" encoding="utf-8"?>
<android.support.constraint.ConstraintLayout xmlns:android="http://schemas.android.com/apk/res/android"
    xmlns:app="http://schemas.android.com/apk/res-auto"
    xmlns:tools="http://schemas.android.com/tools"
    android:layout_width="match_parent"
    android:layout_height="match_parent"
    android:background="#1334EA"
    tools:context=".MainActivity">

    <TextView
        android:layout_width="wrap_content"
        android:layout_height="wrap_content"
        android:textSize="85px"
        android:textColor="#FD1313"
        android:text="puskarcoding.com"
        app:layout_constraintBottom_toBottomOf="parent"
        app:layout_constraintLeft_toLeftOf="parent"
        app:layout_constraintRight_toRightOf="parent"
        app:layout_constraintTop_toTopOf="parent" />

</android.support.constraint.ConstraintLayout>
Step 8 :
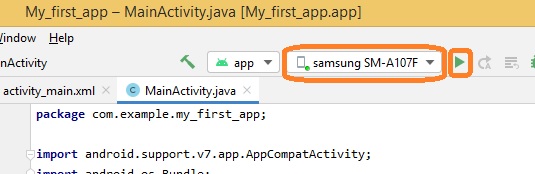
Now, it’s time to run the app on a device or emulator. In my project, I run it in an android device (phone). For this, I connect my Android phone to computer via USB cable (data cable). Now, click the green “Run” button in the toolbar to build and launch your app on the selected device.
If there are any errors or issues in your code, you can fix it using the debugging tools provided by the Android Studio IDE. After run the app in your Android phone, you can see the app like below image.

Step 9 :
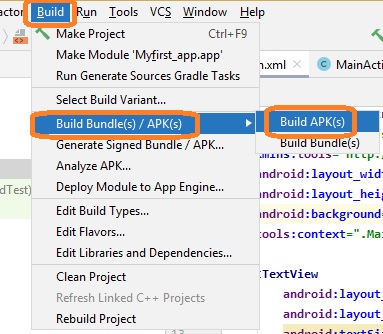
After successfully run the app on your phone, you can build it for distribution. For this, you have to create a signed APK file for the Google Play Store or another distribution platform. In the menu, click on “Build”, then “Build Bundle(s) / APK(s)” and last click on “Build APK(s)”.
After that, the APK will be generated. You have to click on locate to get the APK file.

Finally, you get the APK file in File Explorer as “app-debug.apk”.

Conclusion :
Finally, you have learned how to create a first Android app with Android Studio IDE. This is a very basic Android app. Now you can explore the various element and advanced topics to create your own app. Thank you for visiting my site.