Introduction :
In the digital age, educational application plays a vital role for both learners and educators. Creating a basic multiple choice question (MCQ) app connected to a local server (wampserver) using Android Studio IDE is a very interesting and educational project for Android app developer.
This dynamic MCQ app is based on server-client communication program that connect to WampServer. Building a simple MCQ app using Android Studio is helpful for student as well as teacher in the learning process. Such educational tools or application is useful for various educational purposes like quiz, online-exam etc.
In this article, I shall show you how to create a Multiple Choice Question (MCQ) app connected to a local server (WampServer) using Android Studio. You have to implement HTTP requests in the MCQ app to communicate with the local server (wampserver). Here, I use volley library to connect MCQ app to the local server (wampserver).Using php language, you can send and receive data (questions) between the app and the wampserver.
About the application :
This is a simple MCQ app which connects to a local server (wampServer). Actually, the app is for both student and teacher. When you open the app on your phone, you can see two buttons on the screen. One for student and other for teacher.
When you click on student button, the app will dynamically fetch questions and answer choices from a local server (wampServer). After that, the app displays the question and answer choices to the student for submitting their answer. Then, the submitted answer will be stored in server (wampServer) database.
When you click on teacher button, you can see four buttons by which you can add new questions, update old questions, see all questions with answers and also see students given answer with their name.
In the app, I have shown only 10 questions in student section. You can change as you like. You can also use a remote server (VPS) instead of the local server (wampServer) for this MCQ app. You have to set up the remote server (VPS) for this purpose.
Step for create the application :
Before creating the MCQ app, you have to install Android Studio IDE on your pc. If you do not know how to build an Android app on Android Studio IDE, you can follow the link. After that, you have to install and set up a local server (wampserver) on your pc to handle backend operations.
You can also google search for connect a phone to local server (wampserver) of your pc. You have to follow the below step to build the multiple choice question (MCQ) app.
Step 1 :
First, create a new project “MCQ_app” with empty activity and check on legacy android.support libraries.
Step 2 :
When the app will be build, open manifest file and add the following code before application tag.
<uses-permission android:name="android.permission.INTERNET" />
<uses-permission android:name="android.permission.ACCESS_NETWORK_STATE" />
After that, add the below code in between application tag.
android:usesCleartextTraffic="true"Step 3 :
Now, paste the code in dependencies of build.gradle(module.app) then click on “Sync Now” with net is on your pc.
implementation 'com.android.volley:volley:1.1.0'The dependencies look like below code.
dependencies {
implementation 'com.android.support.constraint:constraint-layout:2.0.4'
testImplementation 'junit:junit:4.+'
androidTestImplementation 'com.android.support.test:runner:1.0.2'
androidTestImplementation 'com.android.support.test.espresso:espresso-core:3.0.2'
implementation 'com.android.volley:volley:1.1.0'
}
Step 4 :
Then, create a folder or directory in the res folder and name it “raw”. Here, you have to paste two file aa.m4a and bb.m4a. The two files are sound files which tell you student answer is right or not. It is optional. You can avoid this step.
Step 5 :
Now, open MainActivity.java file and replace the following code.
package com.example.mcq_app;
import android.content.Intent;
import android.support.v7.app.AppCompatActivity;
import android.os.Bundle;
import android.view.View;
public class MainActivity extends AppCompatActivity {
@Override
protected void onCreate(Bundle savedInstanceState) {
super.onCreate(savedInstanceState);
setContentView(R.layout.activity_main);
}
public void student(View view) {
Intent intent=new Intent(MainActivity.this,MainActivity2.class);
startActivity(intent);
}
public void teacher(View view) {
Intent intent=new Intent(MainActivity.this,MainActivity3.class);
startActivity(intent);
}
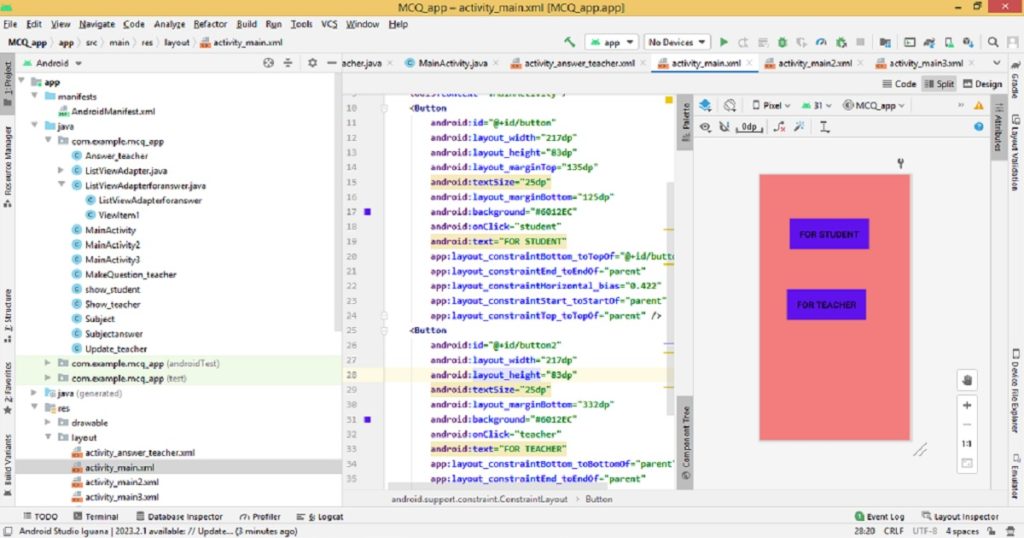
}Now, open activity_main.xml file and replace the following code.
<?xml version="1.0" encoding="utf-8"?>
<android.support.constraint.ConstraintLayout xmlns:android="http://schemas.android.com/apk/res/android"
    xmlns:app="http://schemas.android.com/apk/res-auto"
    xmlns:tools="http://schemas.android.com/tools"
    android:layout_width="match_parent"
    android:layout_height="match_parent"
    android:background="#F37D7D"
    tools:context=".MainActivity">
    <Button
        android:id="@+id/button"
        android:layout_width="217dp"
        android:layout_height="83dp"
        android:layout_marginTop="135dp"
        android:textSize="25dp"
        android:layout_marginBottom="125dp"
        android:background="#6012EC"
        android:onClick="student"
        android:text="FOR STUDENT"
        app:layout_constraintBottom_toTopOf="@+id/button2"
        app:layout_constraintEnd_toEndOf="parent"
        app:layout_constraintHorizontal_bias="0.422"
        app:layout_constraintStart_toStartOf="parent"
        app:layout_constraintTop_toTopOf="parent" />
    <Button
        android:id="@+id/button2"
        android:layout_width="217dp"
        android:layout_height="83dp"
        android:textSize="25dp"
        android:layout_marginBottom="332dp"
        android:background="#6012EC"
        android:onClick="teacher"
        android:text="FOR TEACHER"
        app:layout_constraintBottom_toBottomOf="parent"
        app:layout_constraintEnd_toEndOf="parent"
        app:layout_constraintHorizontal_bias="0.38"
        app:layout_constraintStart_toStartOf="parent" />
</android.support.constraint.ConstraintLayout>
Step 6 :
Then, create a new activity name it MainActivity2 with layout. After that, open MainActivity2.java file and paste the following code.
package com.example.mcq_app;
import android.support.v7.app.AppCompatActivity;
import android.os.Bundle;
import android.app.ProgressDialog;
import android.content.Intent;
import android.view.View;
import android.widget.Button;
import android.widget.EditText;
import android.widget.Toast;
import com.android.volley.Request;
import com.android.volley.RequestQueue;
import com.android.volley.Response;
import com.android.volley.VolleyError;
import com.android.volley.toolbox.StringRequest;
import com.android.volley.toolbox.Volley;
import java.util.HashMap;
import java.util.Map;
public class MainActivity2 extends AppCompatActivity {
    Button button1;
    EditText editText;
    RequestQueue requestQueue;
    String idholder,nameholder,ansholder1,ansholder2,ansholder3,ansholder4,ansholder5,ansholder6,ansholder7,ansholder8,ansholder9,ansholder10;
    String HttpUrl = "http://192.168.43.198/insertname.php";
    ProgressDialog progressDialog;
    @Override
    protected void onCreate(Bundle savedInstanceState) {
        super.onCreate(savedInstanceState);
        setContentView(R.layout.activity_main2);
        editText=findViewById(R.id.name);
        button1=findViewById(R.id.button1);
        requestQueue = Volley.newRequestQueue(MainActivity2.this);
        progressDialog = new ProgressDialog(MainActivity2.this);
        button1.setOnClickListener(new View.OnClickListener() {
            @Override
            public void onClick(View view) {
                progressDialog.setMessage("You are sign in now");
                progressDialog.show();
                GetValueFromEditText();
                StringRequest stringRequest = new StringRequest(Request.Method.POST, HttpUrl,
                        new Response.Listener<String>() {
                            @Override
                            public void onResponse(String ServerResponse) {
                                progressDialog.dismiss();
                                Toast.makeText(MainActivity2.this, ServerResponse, Toast.LENGTH_LONG).show();
                            }
                        },
                        new Response.ErrorListener() {
                            @Override
                            public void onErrorResponse(VolleyError volleyError) {
                                progressDialog.dismiss();
                                Toast.makeText(MainActivity2.this, volleyError.toString(), Toast.LENGTH_LONG).show();
                            }
                        }) {
                    @Override
                    protected Map<String, String> getParams() {
                        Map<String, String> params = new HashMap<String, String>();
                        params.put("id", idholder);
                        params.put("name", nameholder);
                        params.put("que1", ansholder1);
                        params.put("que2", ansholder2);
                        params.put("que3", ansholder3);
                        params.put("que4", ansholder4);
                        params.put("que5", ansholder5);
                        params.put("que6", ansholder6);
                        params.put("que7", ansholder7);
                        params.put("que8", ansholder8);
                        params.put("que9", ansholder9);
                        params.put("que10", ansholder10);
                        return params;
                    }
                };
                RequestQueue requestQueue = Volley.newRequestQueue(MainActivity2.this);
                requestQueue.add(stringRequest);
                Intent intent=new Intent(MainActivity2.this,show_student.class);
                intent.putExtra("full_name", nameholder);
                startActivity(intent);
            }
        });
    }
    public void GetValueFromEditText(){
        nameholder = editText.getText().toString().trim();
        idholder="";
        ansholder1="";
        ansholder2="";
        ansholder3="";
        ansholder4="";
        ansholder5="";
        ansholder6="";
        ansholder7="";
        ansholder8="";
        ansholder9="";
        ansholder10="";
    }
}
Open activity_main2.xml file and replace the following code.
<?xml version="1.0" encoding="utf-8"?>
<android.support.constraint.ConstraintLayout xmlns:android="http://schemas.android.com/apk/res/android"
    xmlns:app="http://schemas.android.com/apk/res-auto"
    xmlns:tools="http://schemas.android.com/tools"
    android:layout_width="match_parent"
    android:layout_height="match_parent"
    android:background="#DF5C5C"
    tools:context=".MainActivity2">
    <EditText
        android:layout_width="match_parent"
        android:layout_height="50dp"
        android:layout_marginBottom="112dp"
        android:hint="enter your name"
        android:id="@+id/name"
        android:textSize="25dp"
        android:background="#FAF4F4"
        app:layout_constraintBottom_toTopOf="@+id/button1"
        app:layout_constraintEnd_toEndOf="parent"
        app:layout_constraintHorizontal_bias="0.0"
        app:layout_constraintStart_toStartOf="parent"
        app:layout_constraintTop_toTopOf="parent"
        app:layout_constraintVertical_bias="1.0"></EditText>
    <Button
        android:id="@+id/button1"
        android:layout_width="wrap_content"
        android:layout_height="wrap_content"
        android:layout_marginStart="8dp"
        android:layout_marginEnd="8dp"
        android:background="#6511FA"
        android:layout_marginBottom="412dp"
        android:textSize="25dp"
        android:text="START EXAM"
        app:layout_constraintBottom_toBottomOf="parent"
        app:layout_constraintEnd_toEndOf="parent"
        app:layout_constraintHorizontal_bias="0.498"
        app:layout_constraintStart_toStartOf="parent"/>
</android.support.constraint.ConstraintLayout>
Step 7 :
Then, create a new activity name it MainActivity3 with layout. After that, open MainActivity3.java file and paste the following code.
package com.example.mcq_app;
import android.support.v7.app.AppCompatActivity;
import android.os.Bundle;
import android.content.Intent;
import android.view.View;
import android.widget.Button;
public class MainActivity3 extends AppCompatActivity {
    Button addbutton,updatebutton,showbutton,allshowbutton;
    @Override
    protected void onCreate(Bundle savedInstanceState) {
        super.onCreate(savedInstanceState);
        setContentView(R.layout.activity_main3);
        addbutton=findViewById(R.id.add);
        updatebutton=findViewById(R.id.update);
        showbutton=findViewById(R.id.show);
        allshowbutton=findViewById(R.id.show_all_ans);
        addbutton.setOnClickListener(new View.OnClickListener() {
            @Override
            public void onClick(View v) {
                Intent intent=new Intent(MainActivity3.this,MakeQuestion_teacher.class);
                startActivity(intent);
            }
        });
        updatebutton.setOnClickListener(new View.OnClickListener() {
            @Override
            public void onClick(View v) {
                Intent intent=new Intent(MainActivity3.this,Update_teacher.class);
                startActivity(intent);
            }
        });
        showbutton.setOnClickListener(new View.OnClickListener() {
            @Override
            public void onClick(View v) {
                Intent intent=new Intent(MainActivity3.this,Show_teacher.class);
                startActivity(intent);
            }
        });
        allshowbutton.setOnClickListener(new View.OnClickListener() {
            @Override
            public void onClick(View v) {
                Intent intent=new Intent(MainActivity3.this,Answer_teacher.class);
                startActivity(intent);
            }
        });
    }
}
Now, open activity_main3.xml file and replace the following code.
<?xml version="1.0" encoding="utf-8"?>
<RelativeLayout xmlns:android="http://schemas.android.com/apk/res/android"
    xmlns:tools="http://schemas.android.com/tools"
    android:layout_width="match_parent"
    android:layout_height="match_parent"
    tools:context=".MainActivity3"
    android:background="#B394EC"
    android:padding="10dp">
    <Button
        android:layout_marginTop="100dp"
        android:layout_width="fill_parent"
        android:layout_height="wrap_content"
        android:background="#FBE412"
        android:textColor="#f22b2b"
        android:textSize="20dp"
        android:text="ADD NEW QUESTION"
        android:id="@+id/add"
        android:layout_centerHorizontal="true"/>
    <Button
        android:layout_marginTop="50dp"
        android:background="#FBE412"
        android:textColor="#f22b2b"
        android:textSize="20dp"
        android:layout_below="@+id/add"
        android:id="@+id/update"
        android:text="UPDATE ANY QUESTION"
        android:layout_width="match_parent"
        android:layout_height="wrap_content" />
    <Button
        android:layout_marginTop="50dp"
        android:background="#FBE412"
        android:textColor="#f22b2b"
        android:textSize="20dp"
        android:layout_below="@+id/update"
        android:id="@+id/show"
        android:text="ALL QUESTION WITH ANSWER"
        android:layout_width="match_parent"
        android:layout_height="wrap_content" />
    <Button
        android:layout_marginTop="50dp"
        android:background="#FBE412"
        android:textColor="#f22b2b"
        android:textSize="20dp"
        android:layout_below="@+id/show"
        android:id="@+id/show_all_ans"
        android:text="ALL ANSWER OF STUDENT"
        android:layout_width="match_parent"
        android:layout_height="wrap_content" />
</RelativeLayout>
Step 8 :
Then, create a new activity name it show_student with layout. After that, open show_student.java file and paste the following code.
package com.example.mcq_app;
import android.content.Context;
import android.content.Intent;
import android.media.MediaPlayer;
import android.os.AsyncTask;
import android.support.v7.app.AppCompatActivity;
import android.os.Bundle;
import android.view.View;
import android.widget.Button;
import android.widget.RadioButton;
import android.widget.RadioGroup;
import android.widget.TextView;
import android.widget.Toast;
import com.android.volley.Request;
import com.android.volley.RequestQueue;
import com.android.volley.Response;
import com.android.volley.VolleyError;
import com.android.volley.toolbox.StringRequest;
import com.android.volley.toolbox.Volley;
import org.json.JSONArray;
import org.json.JSONException;
import org.json.JSONObject;
import java.util.HashMap;
import java.util.List;
import java.util.Map;
public class show_student extends AppCompatActivity {
    RadioButton radioButton,radioButton1,radioButton2,radioButton3,radioButton4;
    RadioGroup radioGroup;
    Button button;
    Intent intent;
    String  fullname;
    String [] rightanswer=new String[10];
    int i=0;
    MediaPlayer mp,mp1;
    int k=0;
    TextView textViewid,textViewquestion;
    String nameHolder, ansHolder1, ansHolder2,ansHolder3,ansHolder4,ansHolder5,ansHolder6,ansHolder7,ansHolder8,ansHolder9,ansHolder10 ;
    String HTTP_URL = "http://your pc ip address/showdata.php";
    String HttpUrl = "http://your pc ip address/insertanswer1.php";
   //your pc ip address like 190.158.43.187
    String FinalJSonObject ;
    RequestQueue requestQueue;
    @Override
    protected void onCreate(Bundle savedInstanceState) {
        super.onCreate(savedInstanceState);
        setContentView(R.layout.activity_show_student);
        radioButton1 = findViewById(R.id.radioButton1);
        radioButton2 = findViewById(R.id.radioButton2);
        radioButton3 = findViewById(R.id.radioButton3);
        radioButton4 = findViewById(R.id.radioButton4);
        radioGroup = findViewById(R.id.radio);
        textViewid = findViewById(R.id.textView1);
        textViewquestion = findViewById(R.id.textView2);
        mp=MediaPlayer.create(this,R.raw.bb);
        mp1=MediaPlayer.create(this,R.raw.aa);
        intent=getIntent();
        showquestionforstudent(i);
    }
    public void next(View view) {
        String l="";
        radioButton=findViewById(radioGroup.getCheckedRadioButtonId());
        try {
            fullname= intent.getStringExtra("full_name");
            nameHolder=fullname;
            l=radioButton.getText().toString();
            if(i==0){ ansHolder1=l;ansHolder2="";ansHolder3="";ansHolder4="";ansHolder5="";ansHolder6="";ansHolder7="";ansHolder8="";ansHolder9="";ansHolder10="";
            }
            else if(i==1){
                ansHolder2=l;ansHolder3="";ansHolder4="";ansHolder5="";ansHolder6="";ansHolder7="";ansHolder8="";ansHolder9="";ansHolder10="";
            }
            else if(i==2){
                ansHolder3=l;ansHolder4="";ansHolder5="";ansHolder6="";ansHolder7="";ansHolder8="";ansHolder9="";ansHolder10="";
            }
            else if(i==3){
                ansHolder4=l;ansHolder5="";ansHolder6="";ansHolder7="";ansHolder8="";ansHolder9="";ansHolder10="";
            }
            else if(i==4){
                ansHolder5=l;ansHolder6="";ansHolder7="";ansHolder8="";ansHolder9="";ansHolder10="";
            }
            else if(i==5){
                ansHolder6=l;ansHolder7="";ansHolder8="";ansHolder9="";ansHolder10="";
            }
            else if(i==6){
                ansHolder7=l;ansHolder8="";ansHolder9="";ansHolder10="";
            }
            else if(i==7){
                ansHolder8=l;ansHolder9="";ansHolder10="";
            }
            else if(i==8){
                ansHolder9=l;ansHolder10="";
            }
            else {
                ansHolder10=l;
            }
            requestQueue = Volley.newRequestQueue(show_student.this);
            StringRequest stringRequest = new StringRequest(Request.Method.POST, HttpUrl,
                    new Response.Listener<String>() {
                        @Override
                        public void onResponse(String ServerResponse) {
                        }
                    },
                    new Response.ErrorListener() {
                        @Override
                        public void onErrorResponse(VolleyError volleyError) {
                            Toast.makeText(show_student.this, volleyError.toString(), Toast.LENGTH_LONG).show();
                        }
                    }) {
                @Override
                protected Map<String, String> getParams() {
                    Map<String, String> params = new HashMap<String, String>();
                    params.put("name", nameHolder);
                    params.put("que1", ansHolder1);
                    params.put("que2", ansHolder2);
                    params.put("que3", ansHolder3);
                    params.put("que4", ansHolder4);
                    params.put("que5", ansHolder5);
                    params.put("que6", ansHolder6);
                    params.put("que7", ansHolder7);
                    params.put("que8", ansHolder8);
                    params.put("que9", ansHolder9);
                    params.put("que10", ansHolder10);
                    return params;
                }
            };
            RequestQueue requestQueue = Volley.newRequestQueue(show_student.this);
            requestQueue.add(stringRequest);
        }
        catch (Exception e){
        }
        radioGroup.clearCheck();
        if(l.equals(rightanswer[i])){
            k++;
            mp.start();
            Toast.makeText(this, "you are right", Toast.LENGTH_SHORT).show();
        }
        else {
            mp1.start();
            Toast.makeText(this, "you are wrong", Toast.LENGTH_SHORT).show();
        }
        i++;
        if(i==10){
            Toast.makeText(this, "you are answer "+String.valueOf(k)+" out of 10", Toast.LENGTH_SHORT).show();
            Intent intent=new Intent(this,MainActivity.class);
            startActivity(intent);
        }
        showquestionforstudent(i);
    }
    private class ParseJSonDataClass extends AsyncTask<Void, Void, Void> {
        public Context context;
        int i;
        List<Subject> CustomSubjectNamesList;
        public ParseJSonDataClass(Context context,int i) {
            this.context = context;
            this.i=i;
        }
        @Override
        protected void onPreExecute() {
            super.onPreExecute();
        }
        @Override
        protected Void doInBackground(Void... arg0) {
            try {
                if (FinalJSonObject != null) {
                    JSONArray jsonArray = null;
                    try {
                        jsonArray = new JSONArray(FinalJSonObject);
                        JSONObject jsonObject;
                        Subject subject;
                        subject = new Subject();
                        jsonObject = jsonArray.getJSONObject(i);
                        subject.Subject_ID = "("+jsonObject.getString("id")+") ";
                        subject.Subject_QUESTION = jsonObject.getString("question");
                        subject.Subject_ANS1 = jsonObject.getString("ans1");
                        subject.Subject_ANS2 =jsonObject.getString("ans2");
                        subject.Subject_ANS3 = jsonObject.getString("ans3");
                        subject.Subject_ANS4 =jsonObject.getString("ans4");
                        subject.Subject_ANSRIGHT = jsonObject.getString("ansright");
                        textViewid.setText(subject.Subject_ID);
                        textViewquestion.setText(subject.Subject_QUESTION);
                        radioButton1.setText(subject.Subject_ANS1);
                        radioButton2.setText(subject.Subject_ANS2);
                        radioButton3.setText(subject.Subject_ANS3);
                        radioButton4.setText(subject.Subject_ANS4);
                        rightanswer[i]=subject.Subject_ANSRIGHT;
                    } catch (JSONException e) {
                        e.printStackTrace();
                    }
                }
            } catch (Exception e) {
                e.printStackTrace();
            }
            return null;
        }
        @Override
        protected void onPostExecute(Void result)
        {
        }
    }
    public void showquestionforstudent(final int i){
        StringRequest stringRequest = new StringRequest(HTTP_URL,
                new Response.Listener<String>() {
                    @Override
                    public void onResponse(String response) {
                        FinalJSonObject = response;
                        new show_student.ParseJSonDataClass(show_student.this,i).execute();
                    }
                },
                new Response.ErrorListener() {
                    @Override
                    public void onErrorResponse(VolleyError error) {
                        Toast.makeText(show_student.this, "not found", Toast.LENGTH_LONG).show();
                    }
                });
        RequestQueue requestQueue = Volley.newRequestQueue(show_student.this);
        requestQueue.add(stringRequest);
    }
}
Now, open activity_show_student.xml file and replace the following code.
<?xml version="1.0" encoding="utf-8"?>
<android.support.constraint.ConstraintLayout xmlns:android="http://schemas.android.com/apk/res/android"
    xmlns:app="http://schemas.android.com/apk/res-auto"
    xmlns:tools="http://schemas.android.com/tools"
    android:layout_width="match_parent"
    android:layout_height="match_parent"
    android:background="#F1E68B"
    tools:context=".show_student">
    <TextView
        android:id="@+id/textView1"
        android:layout_width="152dp"
        android:layout_height="48dp"
        android:layout_marginTop="8dp"
        android:textSize="30dp"
        android:gravity="center_horizontal"
        android:text="TextView"
        app:layout_constraintBottom_toTopOf="@+id/textView2"
        app:layout_constraintEnd_toEndOf="parent"
        app:layout_constraintStart_toStartOf="parent"
        app:layout_constraintTop_toTopOf="parent" />
    <TextView
        android:id="@+id/textView2"
        android:layout_width="407dp"
        android:layout_height="78dp"
        android:textSize="30dp"
        android:gravity="center_horizontal"
        android:layout_marginTop="20dp"
        android:layout_marginBottom="1dp"
        android:text="TextView"
        app:layout_constraintBottom_toTopOf="@+id/radio"
        app:layout_constraintEnd_toEndOf="parent"
        app:layout_constraintHorizontal_bias="1.0"
        app:layout_constraintStart_toStartOf="parent"
        app:layout_constraintTop_toBottomOf="@+id/textView1" />
    <RadioGroup
        android:id="@+id/radio"
        android:layout_width="match_parent"
        android:layout_height="wrap_content"
        android:layout_marginTop="10dp"
        android:padding="10dp"
        app:layout_constraintEnd_toEndOf="parent"
        app:layout_constraintHorizontal_bias="0.695"
        app:layout_constraintStart_toStartOf="parent"
        app:layout_constraintTop_toBottomOf="@+id/textView2">
        <RadioButton
            android:id="@+id/radioButton1"
            android:padding="10dp"
            android:textSize="30dp"
            android:layout_width="match_parent"
            android:layout_height="wrap_content"
            android:text="RadioButton" />
        <RadioButton
            android:padding="10dp"
            android:textSize="30dp"
            android:id="@+id/radioButton2"
            android:layout_width="match_parent"
            android:layout_height="wrap_content"
            android:text="RadioButton" />
        <RadioButton
            android:padding="10dp"
            android:textSize="30dp"
            android:id="@+id/radioButton3"
            android:layout_width="match_parent"
            android:layout_height="wrap_content"
            android:text="RadioButton" />
        <RadioButton
            android:padding="10dp"
            android:textSize="30dp"
            android:id="@+id/radioButton4"
            android:layout_width="match_parent"
            android:layout_height="wrap_content"
            android:text="RadioButton" />
    </RadioGroup>
    <Button
        android:id="@+id/button2"
        android:layout_width="250dp"
        android:layout_height="68dp"
        android:background="#F82B1C"
        android:textColor="#F6F0F0"
        android:text="NEXT QUESTION"
        app:layout_constraintBottom_toBottomOf="parent"
        android:onClick="next"
        app:layout_constraintEnd_toEndOf="parent"
        app:layout_constraintStart_toStartOf="parent"
        app:layout_constraintTop_toBottomOf="@+id/radio"
        app:layout_constraintVertical_bias="0.154" />
</android.support.constraint.ConstraintLayout>
Step 9 :
Then, create a new activity name it Answer_teacher with layout. After that, open Answer_teacher.java file and paste the following code.
package com.example.mcq_app;
import android.support.v7.app.AppCompatActivity;
import android.os.Bundle;
import android.content.Context;
import android.os.AsyncTask;
import android.widget.ListView;
import android.widget.Toast;
import com.android.volley.RequestQueue;
import com.android.volley.Response;
import com.android.volley.VolleyError;
import com.android.volley.toolbox.StringRequest;
import com.android.volley.toolbox.Volley;
import org.json.JSONArray;
import org.json.JSONException;
import org.json.JSONObject;
import java.util.ArrayList;
import java.util.List;
public class Answer_teacher extends AppCompatActivity {
    ListView list_answer;
    String HTTP_answer = "http://your pc ip address/showanswer.php";
   //your pc ip address like 190.158.43.187
    String Final_answer ;
    @Override
    protected void onCreate(Bundle savedInstanceState) {
        super.onCreate(savedInstanceState);
        setContentView(R.layout.activity_answer_teacher);
        list_answer = (ListView) findViewById(R.id.list_View_answer);
        StringRequest string_Request = new StringRequest(HTTP_answer,
                new Response.Listener<String>() {
                    @Override
                    public void onResponse(String response) {
                        Final_answer = response ;
                        new ParseJSonDataClassanswer(Answer_teacher.this).execute();
                    }
                },
                new Response.ErrorListener() {
                    @Override
                    public void onErrorResponse(VolleyError error) {
                        Toast.makeText(Answer_teacher.this,error.getMessage(),Toast.LENGTH_LONG).show();
                    }
                });
        RequestQueue requestQueueanswer = Volley.newRequestQueue(Answer_teacher.this);
        requestQueueanswer.add(string_Request);
    }
    private class ParseJSonDataClassanswer extends AsyncTask<Void, Void, Void> {
        public Context contextanswer;
        List<Subjectanswer> Subject_answer;
        public ParseJSonDataClassanswer(Context context) {
            this.contextanswer = context;
        }
        @Override
        protected void onPreExecute() {
            super.onPreExecute();
        }
        @Override
        protected Void doInBackground(Void... arg0) {
            try {
                if (Final_answer != null) {
                    JSONArray json_Array_answer = null;
                    try {
                        json_Array_answer = new JSONArray(Final_answer);
                        JSONObject json_Object_answer;
                        Subjectanswer subject_answer;
                        Subject_answer = new ArrayList<Subjectanswer>();
                        for (int i = 0; i < json_Array_answer.length(); i++) {
                            subject_answer = new Subjectanswer();
                            json_Object_answer = json_Array_answer.getJSONObject(i);
                            subject_answer.NAME = "NAME OF STUDENT = "+json_Object_answer.getString("name") ;
                            subject_answer.ANS1 = "ANSWER OF NO 1 = "+json_Object_answer.getString("que1");
                            subject_answer.ANS2 =  "ANSWER OF NO 2 = "+json_Object_answer.getString("que2");
                            subject_answer.ANS3 =  "ANSWER OF NO 3 = "+json_Object_answer.getString("que3");
                            subject_answer.ANS4 =  "ANSWER OF NO 4 = "+json_Object_answer.getString("que4");
                            subject_answer.ANS5 =  "ANSWER OF NO 5 = "+json_Object_answer.getString("que5");
                            subject_answer.ANS6 =  "ANSWER OF NO 6 = "+json_Object_answer.getString("que6");
                            subject_answer.ANS7 =  "ANSWER OF NO 7 = "+json_Object_answer.getString("que7");
                            subject_answer.ANS8 =  "ANSWER OF NO 8 = "+json_Object_answer.getString("que8");
                            subject_answer.ANS9 =  "ANSWER OF NO 9 = "+json_Object_answer.getString("que9");
                            subject_answer.ANS10 =  "ANSWER OF NO 10 = "+json_Object_answer.getString("que10");
                            Subject_answer.add(subject_answer);
                        }
                    } catch (JSONException e) {
                        e.printStackTrace();
                    }
                }
            } catch (Exception e) {
                e.printStackTrace();
            }
            return null;
        }
        @Override
        protected void onPostExecute(Void result)
        {
            ListViewAdapterforanswer adapter_answer = new ListViewAdapterforanswer(Subject_answer, contextanswer);
            list_answer.setAdapter(adapter_answer);
        }
    }
}
Now, open activity_answer_teacher.xml file and replace the following code.
<?xml version="1.0" encoding="utf-8"?>
<RelativeLayout xmlns:android="http://schemas.android.com/apk/res/android"
    xmlns:tools="http://schemas.android.com/tools"
    android:layout_width="match_parent"
    android:layout_height="match_parent"
    tools:context=".Answer_teacher">
    <ListView
        android:layout_width="fill_parent"
        android:layout_height="match_parent"
        android:id="@+id/list_View_answer"
        android:layout_alignParentTop="true"
        android:layout_alignParentLeft="true"
        android:layout_alignParentStart="true">
    </ListView>
</RelativeLayout>
Step 10 :
Then, create a new activity name it MakeQuestion_teacher with layout. After that, open MakeQuestion_teacher.java file and paste the following code.
package com.example.mcq_app;
import android.support.v7.app.AppCompatActivity;
import android.os.Bundle;
import android.app.ProgressDialog;
import android.view.View;
import android.widget.Button;
import android.widget.EditText;
import android.widget.Toast;
import com.android.volley.Request;
import com.android.volley.RequestQueue;
import com.android.volley.Response;
import com.android.volley.VolleyError;
import com.android.volley.toolbox.StringRequest;
import com.android.volley.toolbox.Volley;
import java.util.HashMap;
import java.util.Map;
public class MakeQuestion_teacher extends AppCompatActivity {
    EditText questiontext, anstext1, anstext2,anstext3,anstext4,anstextright ;
    Button InsertButton;
    RequestQueue requestQueue;
    String questionHolder, ansHolder1, ansHolder2,ansHolder3,ansHolder4,ansHolderright ;
    ProgressDialog progressDialog;
    String HttpUrl = "http://your pc ip address/data.php";
   //your pc ip address like 190.158.43.187
    @Override
    protected void onCreate(Bundle savedInstanceState) {
        super.onCreate(savedInstanceState);
        setContentView(R.layout.activity_make_question_teacher);
        questiontext = (EditText) findViewById(R.id.que);
        anstext1 = (EditText) findViewById(R.id.ans1);
        anstext2 = (EditText) findViewById(R.id.ans2);
        anstext3 = (EditText) findViewById(R.id.ans3);
        anstext4 = (EditText) findViewById(R.id.ans4);
        anstextright = (EditText) findViewById(R.id.ansright);
        InsertButton = (Button) findViewById(R.id.ButtonInsert);
        requestQueue = Volley.newRequestQueue(MakeQuestion_teacher.this);
        progressDialog = new ProgressDialog(MakeQuestion_teacher.this);
        InsertButton.setOnClickListener(new View.OnClickListener() {
            @Override
            public void onClick(View view) {
                progressDialog.setMessage("your question will be Insert on Server");
                progressDialog.show();
                GetValueFromEditText();
                StringRequest stringRequest = new StringRequest(Request.Method.POST, HttpUrl,
                        new Response.Listener<String>() {
                            @Override
                            public void onResponse(String ServerResponse) {
                                progressDialog.dismiss();
                                Toast.makeText(MakeQuestion_teacher.this, ServerResponse, Toast.LENGTH_LONG).show();
                            }
                        },
                        new Response.ErrorListener() {
                            @Override
                            public void onErrorResponse(VolleyError volleyError) {
                                progressDialog.dismiss();
                                Toast.makeText(MakeQuestion_teacher.this, volleyError.toString(), Toast.LENGTH_LONG).show();
                            }
                        }) {
                    @Override
                    protected Map<String, String> getParams() {
                        Map<String, String> params = new HashMap<String, String>();
                        params.put("question", questionHolder);
                        params.put("ans1", ansHolder1);
                        params.put("ans2", ansHolder2);
                        params.put("ans3", ansHolder3);
                        params.put("ans4", ansHolder4);
                        params.put("ansright", ansHolderright);
                        return params;
                    }
                };
                RequestQueue requestQueue = Volley.newRequestQueue(MakeQuestion_teacher.this);
                requestQueue.add(stringRequest);
            }
        });
    }
    public void GetValueFromEditText(){
        questionHolder = questiontext.getText().toString().trim();
        ansHolder1 = anstext1.getText().toString().trim();
        ansHolder2 = anstext2.getText().toString().trim();
        ansHolder3 = anstext3.getText().toString().trim();
        ansHolder4 = anstext4.getText().toString().trim();
        ansHolderright = anstextright.getText().toString().trim();
    }
}
Now, open activity_make_question_teacher.xml file and replace the following code.
<?xml version="1.0" encoding="utf-8"?>
<RelativeLayout xmlns:android="http://schemas.android.com/apk/res/android"
    xmlns:tools="http://schemas.android.com/tools"
    android:layout_width="match_parent"
    android:layout_height="match_parent"
    tools:context=".MakeQuestion_teacher"
    android:background="#E64646">
    <EditText
        android:layout_width="fill_parent"
        android:layout_height="50dp"
        android:hint="enter your question"
        android:gravity="center"
        android:background="#f1e886"
        android:ems="10"
        android:id="@+id/que"
        android:layout_marginTop="30dp"/>
    <EditText
        android:layout_marginTop="30dp"
        android:layout_width="fill_parent"
        android:layout_height="50dp"
        android:hint="answer no 1"
        android:background="#f1e886"
        android:gravity="center"
        android:ems="10"
        android:id="@+id/ans1"
        android:layout_below="@+id/que"/>
    <EditText
        android:layout_marginTop="30dp"
        android:layout_width="fill_parent"
        android:layout_height="50dp"
        android:ems="10"
        android:id="@+id/ans2"
        android:layout_below="@+id/ans1"
        android:hint="answer no 2"
        android:background="#f1e886"
        android:gravity="center"/>
    <EditText
        android:layout_marginTop="30dp"
        android:layout_width="fill_parent"
        android:layout_height="50dp"
        android:ems="10"
        android:id="@+id/ans3"
        android:layout_below="@+id/ans2"
        android:background="#f1e886"
        android:hint="answer no 3"
        android:gravity="center"/>
    <EditText
        android:layout_marginTop="30dp"
        android:layout_width="fill_parent"
        android:layout_height="50dp"
        android:ems="10"
        android:id="@+id/ans4"
        android:background="#f1e886"
        android:layout_below="@+id/ans3"
        android:hint="answer no 4"
        android:gravity="center"/>
    <EditText
        android:layout_marginTop="30dp"
        android:layout_width="fill_parent"
        android:layout_height="50dp"
        android:background="#f1e886"
        android:ems="10"
        android:id="@+id/ansright"
        android:layout_below="@+id/ans4"
        android:hint=" right answer"
        android:gravity="center"/>
    <Button
        android:layout_marginTop="50dp"
        android:layout_width="fill_parent"
        android:background="#1B84D8"
        android:layout_height="50dp"
        android:text="ADD YOUR QUESTION"
        android:id="@+id/ButtonInsert"
        android:layout_below="@+id/ansright"
        android:layout_centerHorizontal="true"/>
</RelativeLayout>
Step 11 :
Then, create a new activity name it Show_teacher with layout. After that, open Show_teacher.java file and paste the following code.
package com.example.mcq_app;

import android.support.v7.app.AppCompatActivity;
import android.os.Bundle;
import android.content.Context;
import android.os.AsyncTask;
import android.view.View;
import android.widget.ListView;
import android.widget.ProgressBar;
import android.widget.Toast;

import com.android.volley.RequestQueue;
import com.android.volley.Response;
import com.android.volley.VolleyError;
import com.android.volley.toolbox.StringRequest;
import com.android.volley.toolbox.Volley;

import org.json.JSONArray;
import org.json.JSONException;
import org.json.JSONObject;
import java.util.ArrayList;
import java.util.List;
public class Show_teacher extends AppCompatActivity {
    ListView listView;
    String HTTP_URL = "http://your pc ip address/showdata.php";
   //your pc ip address like 190.158.43.187
    String FinalJSonObject ;
    ProgressBar progressBar;
    @Override
    protected void onCreate(Bundle savedInstanceState) {
        super.onCreate(savedInstanceState);
        setContentView(R.layout.activity_show_teacher);
        listView = (ListView) findViewById(R.id.listView1);
        progressBar = (ProgressBar)findViewById(R.id.ProgressBar1);
        progressBar.setVisibility(View.VISIBLE);
        StringRequest stringRequest = new StringRequest(HTTP_URL,
                new Response.Listener<String>() {
                    @Override
                    public void onResponse(String response) {
                        FinalJSonObject = response ;
                        new ParseJSonDataClass(Show_teacher.this).execute();
                    }
                },
                new Response.ErrorListener() {
                    @Override
                    public void onErrorResponse(VolleyError error) {
                        Toast.makeText(Show_teacher.this,error.getMessage(),Toast.LENGTH_LONG).show();
                    }
                });
        RequestQueue requestQueue = Volley.newRequestQueue(Show_teacher.this);
        requestQueue.add(stringRequest);
    }
    private class ParseJSonDataClass extends AsyncTask<Void, Void, Void> {
        public Context context;
        List<Subject> CustomSubjectNamesList;
        public ParseJSonDataClass(Context context) {
            this.context = context;
        }
        @Override
        protected void onPreExecute() {
            super.onPreExecute();
        }
        @Override
        protected Void doInBackground(Void... arg0) {
            try {
                if (FinalJSonObject != null) {
                    JSONArray jsonArray = null;
                    try {
                        jsonArray = new JSONArray(FinalJSonObject);
                        JSONObject jsonObject;
                        Subject subject;
                        CustomSubjectNamesList = new ArrayList<Subject>();
                        for (int i = 0; i < jsonArray.length(); i++) {
                            subject = new Subject();
                            jsonObject = jsonArray.getJSONObject(i);
                            subject.Subject_ID = "("+jsonObject.getString("id")+") ";
                            subject.Subject_QUESTION = jsonObject.getString("question");
                            subject.Subject_ANS1 = "(A) "+jsonObject.getString("ans1");
                            subject.Subject_ANS2 = "(B) "+jsonObject.getString("ans2");
                            subject.Subject_ANS3 ="(C) "+ jsonObject.getString("ans3");
                            subject.Subject_ANS4 = "(D) "+jsonObject.getString("ans4");
                            subject.Subject_ANSRIGHT = "RIGHT ANSWER = "+jsonObject.getString("ansright");
                            CustomSubjectNamesList.add(subject);
                        }
                    } catch (JSONException e) {
                        e.printStackTrace();
                    }
                }
            } catch (Exception e) {
                e.printStackTrace();
            }
            return null;
        }
        @Override
        protected void onPostExecute(Void result)
        {
            ListViewAdapter adapter = new ListViewAdapter(CustomSubjectNamesList, context);
            listView.setAdapter(adapter);
            progressBar.setVisibility(View.GONE);
        }
    }
}
Now, open activity_show_teacher.xml file and replace the following code.
<?xml version="1.0" encoding="utf-8"?>
<RelativeLayout xmlns:android="http://schemas.android.com/apk/res/android"
    xmlns:tools="http://schemas.android.com/tools"
    android:layout_width="match_parent"
    android:layout_height="match_parent"
    android:layout_margin="10dp"
    tools:context=".Show_teacher">
    <ListView
        android:layout_width="fill_parent"
        android:layout_height="match_parent"
        android:id="@+id/listView1"
        android:layout_alignParentTop="true"
        android:layout_alignParentLeft="true"
        android:layout_alignParentStart="true">
    </ListView>
    <ProgressBar
        android:id="@+id/ProgressBar1"
        android:layout_width="wrap_content"
        android:layout_height="wrap_content"
        android:layout_centerInParent="true"
        android:visibility="gone"/>
</RelativeLayout>
Step 12 :
Then, create a new activity name it Update_teacher with layout. After that, open Update_teacher.java file and paste the following code.
package com.example.mcq_app;
import android.support.v7.app.AppCompatActivity;
import android.os.Bundle;
import android.app.ProgressDialog;
import android.view.View;
import android.widget.Button;
import android.widget.EditText;
import android.widget.Toast;
import com.android.volley.Request;
import com.android.volley.RequestQueue;
import com.android.volley.Response;
import com.android.volley.VolleyError;
import com.android.volley.toolbox.StringRequest;
import com.android.volley.toolbox.Volley;
import java.util.HashMap;
import java.util.Map;
public class Update_teacher extends AppCompatActivity {
    EditText idtext, questiontext, anstext1, anstext2,anstext3,anstext4,anstextright ;
    Button InsertButton;
    RequestQueue requestQueue;
    String idHolder,questionHolder, ansHolder1, ansHolder2,ansHolder3,ansHolder4,ansHolderright ;
    ProgressDialog progressDialog;
    String HttpUrl = "http://your pc ip address/update.php";
   //your pc ip address like 190.158.43.187
    @Override
    protected void onCreate(Bundle savedInstanceState) {
        super.onCreate(savedInstanceState);
        setContentView(R.layout.activity_update_teacher);
        idtext=(EditText) findViewById(R.id.id_update);
        questiontext = (EditText) findViewById(R.id.que_update);
        anstext1 = (EditText) findViewById(R.id.ans1_update);
        anstext2 = (EditText) findViewById(R.id.ans2_update);
        anstext3 = (EditText) findViewById(R.id.ans3_update);
        anstext4 = (EditText) findViewById(R.id.ans4_update);
        anstextright = (EditText) findViewById(R.id.ansright_update);
        InsertButton = (Button) findViewById(R.id.ButtonInsert_update);
        requestQueue = Volley.newRequestQueue(Update_teacher.this);
        progressDialog = new ProgressDialog(Update_teacher.this);
        InsertButton.setOnClickListener(new View.OnClickListener() {
            @Override
            public void onClick(View view) {
                progressDialog.setMessage("Your quction will be update on Server");
                progressDialog.show();
                GetValueFromEditText();
                StringRequest stringRequest = new StringRequest(Request.Method.POST, HttpUrl,
                        new Response.Listener<String>() {
                            @Override
                            public void onResponse(String ServerResponse) {
                                progressDialog.dismiss();
                                Toast.makeText(Update_teacher.this, ServerResponse, Toast.LENGTH_LONG).show();
                            }
                        },
                        new Response.ErrorListener() {
                            @Override
                            public void onErrorResponse(VolleyError volleyError) {
                                progressDialog.dismiss();
                                Toast.makeText(Update_teacher.this, volleyError.toString(), Toast.LENGTH_LONG).show();
                            }
                        }) {
                    @Override
                    protected Map<String, String> getParams() {
                        Map<String, String> params = new HashMap<String, String>();
                        params.put("id",idHolder);
                        params.put("question", questionHolder);
                        params.put("ans1", ansHolder1);
                        params.put("ans2", ansHolder2);
                        params.put("ans3", ansHolder3);
                        params.put("ans4", ansHolder4);
                        params.put("ansright", ansHolderright);
                        return params;
                    }
                };
                RequestQueue requestQueue = Volley.newRequestQueue(Update_teacher.this);
                requestQueue.add(stringRequest);
            }
        });
    }
    public void GetValueFromEditText() {
        idHolder = idtext.getText().toString().trim();
        questionHolder = questiontext.getText().toString().trim();
        ansHolder1 = anstext1.getText().toString().trim();
        ansHolder2 = anstext2.getText().toString().trim();
        ansHolder3 = anstext3.getText().toString().trim();
        ansHolder4 = anstext4.getText().toString().trim();
        ansHolderright = anstextright.getText().toString().trim();
    }
}
Now, open activity_update_teacher.xml file and replace the following code.
<?xml version="1.0" encoding="utf-8"?>
<RelativeLayout xmlns:android="http://schemas.android.com/apk/res/android"
    xmlns:tools="http://schemas.android.com/tools"
    android:layout_width="match_parent"
    android:layout_height="match_parent"
    tools:context=".Update_teacher"
    android:background="#DA1616">
    <EditText
        android:layout_width="fill_parent"
        android:layout_height="50dp"
        android:hint="enter question number"
        android:gravity="center"
        android:inputType="number"
        android:background="#F3DF0C"
        android:ems="10"
        android:id="@+id/id_update"
        android:layout_marginTop="30dp"/>
    <EditText
        android:layout_width="fill_parent"
        android:layout_height="50dp"
        android:layout_below="@+id/id_update"
        android:hint="enter your question"
        android:gravity="center"
        android:background="#F3DF0C"
        android:ems="10"
        android:id="@+id/que_update"
        android:layout_marginTop="30dp"/>
    <EditText
        android:layout_marginTop="30dp"
        android:layout_width="fill_parent"
        android:layout_height="50dp"
        android:hint="answer no 1"
        android:background="#F3DF0C"
        android:gravity="center"
        android:ems="10"
        android:id="@+id/ans1_update"
        android:layout_below="@+id/que_update"/>
    <EditText
        android:layout_marginTop="30dp"
        android:layout_width="fill_parent"
        android:layout_height="50dp"
        android:ems="10"
        android:id="@+id/ans2_update"
        android:layout_below="@+id/ans1_update"
        android:hint="answer no 2"
        android:background="#F3DF0C"
        android:gravity="center"/>
    <EditText
        android:layout_marginTop="30dp"
        android:layout_width="fill_parent"
        android:layout_height="50dp"
        android:ems="10"
        android:id="@+id/ans3_update"
        android:layout_below="@+id/ans2_update"
        android:background="#F3DF0C"
        android:hint="answer no 3"
        android:gravity="center"/>
    <EditText
        android:layout_marginTop="30dp"
        android:layout_width="fill_parent"
        android:layout_height="50dp"
        android:ems="10"
        android:id="@+id/ans4_update"
        android:background="#F3DF0C"
        android:layout_below="@+id/ans3_update"
        android:hint="answer no 4"
        android:gravity="center"/>
    <EditText
        android:layout_marginTop="30dp"
        android:layout_width="fill_parent"
        android:layout_height="50dp"
        android:background="#F3DF0C"
        android:ems="10"
        android:id="@+id/ansright_update"
        android:layout_below="@+id/ans4_update"
        android:hint=" right answer"
        android:gravity="center"/>
    <Button
        android:layout_marginTop="30dp"
        android:layout_width="fill_parent"
        android:background="#18F121"
        android:layout_height="50dp"
        android:text="UPDATE YOUR QUESTION"
        android:id="@+id/ButtonInsert_update"
        android:layout_below="@+id/ansright_update"
        android:layout_centerHorizontal="true" />

</RelativeLayout>
After all activity when complete, the manifest file look like below code.
<?xml version="1.0" encoding="utf-8"?>
<manifest xmlns:android="http://schemas.android.com/apk/res/android"
    package="com.example.mcq_app">
    <uses-permission android:name="android.permission.INTERNET" />
    <uses-permission android:name="android.permission.ACCESS_NETWORK_STATE" />
    <application
        android:allowBackup="true"
        android:icon="@mipmap/ic_launcher"
        android:label="@string/app_name"
        android:roundIcon="@mipmap/ic_launcher_round"
        android:supportsRtl="true"
        android:theme="@style/Theme.MCQ_app"
        android:usesCleartextTraffic="true">
        <activity android:name=".Update_teacher"></activity>
        <activity android:name=".Show_teacher" />
        <activity android:name=".MakeQuestion_teacher" />
        <activity android:name=".Answer_teacher" />
        <activity android:name=".show_student" />
        <activity android:name=".MainActivity3" />
        <activity android:name=".MainActivity2" />
        <activity android:name=".MainActivity">
            <intent-filter>
                <action android:name="android.intent.action.MAIN" />
                <category android:name="android.intent.category.LAUNCHER" />
            </intent-filter>
        </activity>
    </application>
</manifest>
Step 13 :
Create a layout resource file in layout folder and name it listview_items_student. Open listview_items_student.xml file and paste the below code.
<?xml version="1.0" encoding="utf-8"?>
<RelativeLayout xmlns:android="http://schemas.android.com/apk/res/android"
    android:layout_width="match_parent"
    android:layout_height="match_parent">
    <TextView
        android:layout_width="wrap_content"
        android:layout_height="wrap_content"
        android:id="@+id/textviewID"
        android:text="ID "
        android:textSize="22dp"
        android:textColor="#000"
        android:layout_alignParentTop="true"
        android:layout_marginTop="10dp"/>
    <TextView
        android:id="@+id/textviewquestion"
        android:layout_width="wrap_content"
        android:layout_height="wrap_content"
        android:text="question Show Here"
        android:textColor="#2196F3"
        android:textSize="20dp"
        android:layout_toRightOf="@+id/textviewID"
        android:layout_marginTop="10dp"/>
    <RadioGroup
        android:layout_marginTop="10dp"
        android:id="@+id/radiogroup"
        android:layout_below="@+id/textviewquestion"
        android:layout_width="match_parent"
        android:layout_height="wrap_content">
        <RadioButton
            android:text="pppppppppp"
            android:id="@+id/r1"
            android:textColor="#2196F3"
            android:layout_width="wrap_content"
            android:layout_height="wrap_content" />
        <RadioButton
            android:id="@+id/r2"
            android:text="pppppppppp"
            android:textColor="#2196F3"
            android:layout_width="wrap_content"
            android:layout_height="wrap_content" />
        <RadioButton
            android:id="@+id/r3"
            android:text="pppppppppp"
            android:textColor="#2196F3"
            android:layout_width="wrap_content"
            android:layout_height="wrap_content" />
        <RadioButton
            android:id="@+id/r4"
            android:text="pppppppppp"
            android:textColor="#2196F3"
            android:layout_width="wrap_content"
            android:layout_height="wrap_content" />
    </RadioGroup>
</RelativeLayout>
Step 14 :
Create a layout resource file in layout folder and name it listview_items_teacher. Open listview_items_teacher.xml file and paste the below code.
<?xml version="1.0" encoding="utf-8"?>
<RelativeLayout xmlns:android="http://schemas.android.com/apk/res/android"
    android:layout_width="match_parent"
    android:background="#0B83FB"
    android:layout_height="match_parent">
    <TextView
        android:layout_width="wrap_content"
        android:layout_height="wrap_content"
        android:id="@+id/textviewID"
        android:text="ID "
        android:textSize="22dp"
        android:textColor="#000"
        android:layout_alignParentTop="true"
        android:layout_marginTop="10dp"/>
    <TextView
        android:id="@+id/textviewquestion"
        android:layout_width="wrap_content"
        android:layout_height="wrap_content"
        android:text="question Show Here"
        android:textColor="#F81908"
        android:textSize="30dp"
        android:layout_toRightOf="@+id/textviewID"
        android:layout_marginTop="10dp"/>
    <TextView
        android:id="@+id/textviewans1"
        android:layout_width="wrap_content"
        android:layout_height="wrap_content"
        android:text="answer 1"
        android:textColor="#FAF9F7"
        android:textSize="25dp"
        android:layout_below="@+id/textviewquestion"
        android:layout_marginTop="10dp"/>
    <TextView
        android:id="@+id/textviewans2"
        android:layout_width="wrap_content"
        android:layout_height="wrap_content"
        android:text="answer 2"
        android:textColor="#FAF9F7"
        android:textSize="25dp"
        android:layout_below="@+id/textviewans1"
        android:layout_marginTop="10dp"/>
    <TextView
        android:id="@+id/textviewans3"
        android:layout_width="wrap_content"
        android:layout_height="wrap_content"
        android:text="answer 3"
        android:textColor="#FAF9F7"
        android:textSize="25dp"
        android:layout_below="@+id/textviewans2"
        android:layout_marginTop="10dp"/>
    <TextView
        android:id="@+id/textviewans4"
        android:layout_width="wrap_content"
        android:layout_height="wrap_content"
        android:text="answer 4"
        android:textColor="#FAF9F7"
        android:textSize="25dp"
        android:layout_below="@+id/textviewans3"
        android:layout_marginTop="10dp"/>
    <TextView
        android:id="@+id/textviewansright"
        android:layout_width="wrap_content"
        android:layout_height="wrap_content"
        android:text="right answer"
        android:textColor="#FAF9F7"
        android:textSize="25dp"
        android:layout_below="@+id/textviewans4"
        android:layout_marginTop="10dp"/>
</RelativeLayout>
Step 15 :
Create a layout resource file in layout folder and name it listview_itemsanswer. Open listview_itemsanswer.xml file and paste the below code.
<?xml version="1.0" encoding="utf-8"?>
<RelativeLayout xmlns:android="http://schemas.android.com/apk/res/android"
    android:layout_width="match_parent"
    android:background="#63614E"
    android:layout_height="match_parent">
    <TextView
        android:layout_width="wrap_content"
        android:layout_height="wrap_content"
        android:id="@+id/textNAMEanswer"
        android:text="ID "
        android:textSize="22dp"
        android:textColor="#F6BB08"
        android:layout_alignParentTop="true"
        android:layout_marginTop="10dp"/>
    <TextView
        android:id="@+id/textanswer1"
        android:layout_width="wrap_content"
        android:layout_height="wrap_content"
        android:text="answer"
        android:textColor="#FBFBFB"
        android:textSize="20dp"
        android:layout_below="@+id/textNAMEanswer"
        android:layout_marginTop="10dp"/>
    <TextView
        android:id="@+id/textanswer2"
        android:layout_width="wrap_content"
        android:layout_height="wrap_content"
        android:text="answer"
        android:textColor="#FBFBFB"
        android:textSize="20dp"
        android:layout_below="@+id/textanswer1"
        android:layout_marginTop="10dp"/>
    <TextView
        android:id="@+id/textanswer3"
        android:layout_width="wrap_content"
        android:layout_height="wrap_content"
        android:text="answer"
        android:textColor="#FBFBFB"
        android:textSize="20dp"
        android:layout_below="@+id/textanswer2"
        android:layout_marginTop="10dp"/>
    <TextView
        android:id="@+id/textanswer4"
        android:layout_width="wrap_content"
        android:layout_height="wrap_content"
        android:text="answer"
        android:textColor="#FBFBFB"
        android:textSize="20dp"
        android:layout_below="@+id/textanswer3"
        android:layout_marginTop="10dp"/>
    <TextView
        android:id="@+id/textanswer5"
        android:layout_width="wrap_content"
        android:layout_height="wrap_content"
        android:text="answer"
        android:textColor="#FBFBFB"
        android:textSize="20dp"
        android:layout_below="@+id/textanswer4"
        android:layout_marginTop="10dp"/>
    <TextView
        android:id="@+id/textanswer6"
        android:layout_width="wrap_content"
        android:layout_height="wrap_content"
        android:text="answer"
        android:textColor="#FBFBFB"
        android:textSize="20dp"
        android:layout_below="@+id/textanswer5"
        android:layout_marginTop="10dp"/>
    <TextView
        android:id="@+id/textanswer7"
        android:layout_width="wrap_content"
        android:layout_height="wrap_content"
        android:text="answer"
        android:textColor="#FBFBFB"
        android:textSize="20dp"
        android:layout_below="@+id/textanswer6"
        android:layout_marginTop="10dp"/>
    <TextView
        android:id="@+id/textanswer8"
        android:layout_width="wrap_content"
        android:layout_height="wrap_content"
        android:text="answer"
        android:textColor="#FBFBFB"
        android:textSize="20dp"
        android:layout_below="@+id/textanswer7"
        android:layout_marginTop="10dp"/>
    <TextView
        android:id="@+id/textanswer9"
        android:layout_width="wrap_content"
        android:layout_height="wrap_content"
        android:text="answer"
        android:textColor="#FBFBFB"
        android:textSize="20dp"
        android:layout_below="@+id/textanswer8"
        android:layout_marginTop="10dp"/>
    <TextView
        android:id="@+id/textanswer10"
        android:layout_width="wrap_content"
        android:layout_height="wrap_content"
        android:text="answer"
        android:textColor="#FBFBFB"
        android:textSize="20dp"
        android:layout_below="@+id/textanswer9"
        android:layout_marginTop="10dp"/>
</RelativeLayout>
Step 16 :
Create a java file in com.example.mcq_app folder and name it ListViewAdapter. Open ListViewAdapter.java file and paste the below code.
package com.example.mcq_app;
import android.app.Activity;
import android.content.Context;
import android.view.LayoutInflater;
import android.view.View;
import android.view.ViewGroup;
import android.widget.BaseAdapter;
import android.widget.TextView;
import java.util.List;
public class ListViewAdapter extends BaseAdapter
{
    Context context;
    List<Subject> TempSubjectList;
    public ListViewAdapter(List<Subject> listValue, Context context)
    {
        this.context = context;
        this.TempSubjectList = listValue;
    }
    @Override
    public int getCount()
    {
        return this.TempSubjectList.size();
    }
    @Override
    public Object getItem(int position)
    {
        return this.TempSubjectList.get(position);
    }
    @Override
    public long getItemId(int position)
    {
        return position;
    }
    @Override
    public View getView(int position, View convertView, ViewGroup parent)
    {
        ViewItem viewItem = null;
        if(convertView == null)
        {
            viewItem = new ViewItem();
            LayoutInflater layoutInfiater = (LayoutInflater)this.context.getSystemService(Activity.LAYOUT_INFLATER_SERVICE);
            convertView = layoutInfiater.inflate(R.layout.listview_items_teacher, null);
            viewItem.IdTextView = (TextView)convertView.findViewById(R.id.textviewID);
            viewItem.QuestionTextView = (TextView)convertView.findViewById(R.id.textviewquestion);
            viewItem.AnswerTextView1 = (TextView)convertView.findViewById(R.id.textviewans1);
            viewItem.AnswerTextView2 = (TextView)convertView.findViewById(R.id.textviewans2);
            viewItem.AnswerTextView3 = (TextView)convertView.findViewById(R.id.textviewans3);
            viewItem.AnswerTextView4 = (TextView)convertView.findViewById(R.id.textviewans4);
            viewItem.AnswerTextViewright = (TextView)convertView.findViewById(R.id.textviewansright);
            convertView.setTag(viewItem);
        }
        else
        {
            viewItem = (ViewItem) convertView.getTag();
        }
        viewItem.IdTextView.setText(TempSubjectList.get(position).Subject_ID);
        viewItem.QuestionTextView.setText(TempSubjectList.get(position).Subject_QUESTION);
        viewItem.AnswerTextView1.setText(TempSubjectList.get(position).Subject_ANS1);
        viewItem.AnswerTextView2.setText(TempSubjectList.get(position).Subject_ANS2);
        viewItem.AnswerTextView3.setText(TempSubjectList.get(position).Subject_ANS3);
        viewItem.AnswerTextView4.setText(TempSubjectList.get(position).Subject_ANS4);
        viewItem.AnswerTextViewright.setText(TempSubjectList.get(position).Subject_ANSRIGHT);
        return convertView;
    }
}
class ViewItem
{
    TextView IdTextView;
    TextView QuestionTextView,AnswerTextView1,AnswerTextView2,AnswerTextView3,AnswerTextView4,AnswerTextViewright;
}
Step 17 :
Create a java file in com.example.mcq_app folder and name it ListViewAdapterforanswer. Open ListViewAdapterforanswer.java file and paste the below code.
package com.example.mcq_app;
import android.app.Activity;
import android.content.Context;
import android.view.LayoutInflater;
import android.view.View;
import android.view.ViewGroup;
import android.widget.BaseAdapter;
import android.widget.TextView;
import java.util.List;
public class ListViewAdapterforanswer extends BaseAdapter
{
    Context contextanswer ;
    List<Subjectanswer> TempSubjectListanswer;
    public ListViewAdapterforanswer(List<Subjectanswer> listValue, Context context)
    {
        this.contextanswer = context;
        this.TempSubjectListanswer = listValue;
    }
    @Override
    public int getCount()
    {
        return this.TempSubjectListanswer.size();
    }
    @Override
    public Object getItem(int position)
    {
        return this.TempSubjectListanswer.get(position);
    }
    @Override
    public long getItemId(int position)
    {
        return position;
    }
    @Override
    public View getView(int position, View convertViewanswer, ViewGroup parent)
    {
        ViewItem1 viewItemanswer = null;
        if(convertViewanswer == null)
        {
            viewItemanswer = new ViewItem1();
            LayoutInflater layoutInfiateranswer = (LayoutInflater)this.contextanswer.getSystemService(Activity.LAYOUT_INFLATER_SERVICE);
            convertViewanswer = layoutInfiateranswer.inflate(R.layout.listview_itemsanswer, null);
            viewItemanswer.nameTextViewanswer = (TextView)convertViewanswer.findViewById(R.id.textNAMEanswer);
            viewItemanswer.TextView_answer1 = (TextView)convertViewanswer.findViewById(R.id.textanswer1);
            viewItemanswer.TextView_answer2 = (TextView)convertViewanswer.findViewById(R.id.textanswer2);
            viewItemanswer.TextView_answer3 = (TextView)convertViewanswer.findViewById(R.id.textanswer3);
            viewItemanswer.TextView_answer4 = (TextView)convertViewanswer.findViewById(R.id.textanswer4);
            viewItemanswer.TextView_answer5 = (TextView)convertViewanswer.findViewById(R.id.textanswer5);
            viewItemanswer.TextView_answer6 = (TextView)convertViewanswer.findViewById(R.id.textanswer6);
            viewItemanswer.TextView_answer7 = (TextView)convertViewanswer.findViewById(R.id.textanswer7);
            viewItemanswer.TextView_answer8 = (TextView)convertViewanswer.findViewById(R.id.textanswer8);
            viewItemanswer.TextView_answer9 = (TextView)convertViewanswer.findViewById(R.id.textanswer9);
            viewItemanswer.TextView_answer10 = (TextView)convertViewanswer.findViewById(R.id.textanswer10);
            convertViewanswer.setTag(viewItemanswer);
        }
        else
        {
            viewItemanswer = (ViewItem1) convertViewanswer.getTag();
        }
        viewItemanswer.nameTextViewanswer.setText(TempSubjectListanswer.get(position).NAME);
        viewItemanswer.TextView_answer1.setText(TempSubjectListanswer.get(position).ANS1);
        viewItemanswer.TextView_answer2.setText(TempSubjectListanswer.get(position).ANS2);
        viewItemanswer.TextView_answer3.setText(TempSubjectListanswer.get(position).ANS3);
        viewItemanswer.TextView_answer4.setText(TempSubjectListanswer.get(position).ANS4);
        viewItemanswer.TextView_answer5.setText(TempSubjectListanswer.get(position).ANS5);
        viewItemanswer.TextView_answer6.setText(TempSubjectListanswer.get(position).ANS6);
        viewItemanswer.TextView_answer7.setText(TempSubjectListanswer.get(position).ANS7);
        viewItemanswer.TextView_answer8.setText(TempSubjectListanswer.get(position).ANS8);
        viewItemanswer.TextView_answer9.setText(TempSubjectListanswer.get(position).ANS9);
        viewItemanswer.TextView_answer10.setText(TempSubjectListanswer.get(position).ANS10);
        return convertViewanswer;
    }
}
class ViewItem1
{
    TextView nameTextViewanswer;
    TextView TextView_answer1,TextView_answer2,TextView_answer3,TextView_answer4,TextView_answer5,TextView_answer6,TextView_answer7,TextView_answer8,TextView_answer9,TextView_answer10;
}
Step 18 :
Create a java file in com.example.mcq_app folder and name it Subject. Open Subject.java file and paste the below code.
package com.example.mcq_app;
public class Subject {
    public String Subject_ID;
    public String Subject_QUESTION;
    public String Subject_ANS1;
    public String Subject_ANS2;
    public String Subject_ANS3;
    public String Subject_ANS4;
    public String Subject_ANSRIGHT;
}
Step 19 :
Create a java file in com.example.mcq_app folder and name it Subjectanswer. Open Subjectanswer.java file and paste the below code.
package com.example.mcq_app;
class Subjectanswer {
    public String NAME;
    public String ANS1;
    public String ANS2;
    public String ANS3;
    public String ANS4;
    public String ANS5;
    public String ANS6;
    public String ANS7;
    public String ANS8;
    public String ANS9;
    public String ANS10;
}
Step 20 :
After creating all files and paste the code, open wampserver on your pc. Here, you have to create a database named “kritika”. Now create two table “moc1” and “student”. In “moc1” table create the column id, question, ans1, ans2, ans3, ans4 and ansright. In “student” table create the column id, name, que1, que2, que3, que4, que5, que6, que7, que8, que9, que10.
Now, you have to open www folder of File Explorer. In C:\wamp64\www folder you have to paste the following php files. First create insertname.php and paste the below code.
<?php
$HostName = 'localhost:3308';
$HostUser = 'root';
$HostPass = '';
$DatabaseName = 'kritika';
 $con = mysqli_connect($HostName,$HostUser,$HostPass,$DatabaseName);
 $name = $_POST['name'];
 $ans1 = $_POST['que1'];
 $ans2 = $_POST['que2'];
 $ans3 = $_POST['que3'];
 $ans4 = $_POST['que4'];
 $ans5 = $_POST['que5'];
 $ans6 = $_POST['que6'];
 $ans7 = $_POST['que7'];
 $ans8 = $_POST['que8'];
 $ans9 = $_POST['que9'];
 $ans10 = $_POST['que10'];
$result1 = $con->query("SELECT name FROM student WHERE name = '$name'");
$row_count = $result1->num_rows;
if($row_count == 1)
{
    echo 'User exists';
}
else
{
 $Sql_Query = "INSERT INTO student (name,que1,que2,que3,que4,que5,que6,que7,que8,que9,que10) values
('$name','$ans1','$ans2','$ans3','$ans4','$ans5','$ans6','$ans7','$ans8','$ans9','$ans10')";
 if($con->query($Sql_Query) === TRUE){
 echo 'login Successfully';
 }
 else{
 echo 'error';
 }
}
 mysqli_close($con);
 ?>
Step 21 :
Create showdata.php and paste the below code.
<?php
$HostName = 'localhost:3308';
$HostUser = 'root';
$HostPass = '';
$DatabaseName = 'kritika';
 $con = mysqli_connect($HostName,$HostUser,$HostPass,$DatabaseName);
if ($con->connect_error) {
 die("Connection failed: " . $con->connect_error);
}
$sql = "SELECT * FROM moc1";
$result = $con->query($sql);
if ($result->num_rows >0) {
 while($row[] = $result->fetch_assoc()) {
 $tem = $row;
 $json = json_encode($tem);
 }
} else {
 echo "No Results Found.";
}
 echo $json;
$con->close();
?>
Step 22 :
Create data.php and paste the below code.
<?php
$HostName = 'localhost:3308';
$HostUser = 'root';
$HostPass = '';
$DatabaseName = 'kritika';
 $con = mysqli_connect($HostName,
$HostUser,$HostPass,$DatabaseName);
 $ques = $_POST['question'];
 $ans1 = $_POST['ans1'];
 $ans2 = $_POST['ans2'];
 $ans3 = $_POST['ans3'];
 $ans4 = $_POST['ans4'];
 $ansright = $_POST['ansright'];
 $Sql_Query = "INSERT INTO moc1
(question,ans1,ans2,ans3,ans4,ansright)
values
('$ques','$ans1','$ans2','$ans3','$ans4','$ansright')";
 if($con->query($Sql_Query) === TRUE){
 echo 'Question Inserted on server Successfully';
 }
 else{
echo "Something went wrong";
 }
 mysqli_close($con);
 ?>
Step 23 :
Create update.php and paste the below code.
<?php
$HostName = 'localhost:3308';
$HostUser = 'root';
$HostPass = '';
$DatabaseName = 'kritika';
 $con = mysqli_connect($HostName,$HostUser,$HostPass,$DatabaseName);
 $id=$_POST['id'];
 $ques = $_POST['question'];
 $ans1 = $_POST['ans1'];
 $ans2 = $_POST['ans2'];
 $ans3 = $_POST['ans3'];
 $ans4 = $_POST['ans4'];
 $ansright = $_POST['ansright'];
 $Sql_Query = "UPDATE moc1 SET question='$ques',ans1='$ans1',ans2='$ans2',ans3='$ans3',ans4='$ans4',ansright='$ansright' WHERE id = $id";
 if($con->query($Sql_Query) === TRUE){
 echo 'Question updated Successfully';
 }
 else{
 echo "Something went wrong";
 }
 mysqli_close($con);
?>
Step 24 :
Create showanswer.php and paste the below code.
<?php
$HostName = 'localhost:3308';
$HostUser = 'root';
$HostPass = '';
$DatabaseName = 'kritika';
 $con = mysqli_connect($HostName,$HostUser,$HostPass,$DatabaseName);
if ($con->connect_error) {
 die("Connection failed: " . $con->connect_error);
}
$sql = "SELECT *  FROM student";
$result = $con->query($sql);
if ($result->num_rows >0) {
 while($row[] = $result->fetch_assoc()) {
 $tem = $row;
 $json = json_encode($tem);
 }
} else {
 echo "No Results Found.";
}
 echo $json;
$con->close();
?>
Step 25 :
Create insertanswer1.php and paste the below code.
<?php
$HostName = 'localhost:3308';
$HostUser = 'root';
$HostPass = '';
$DatabaseName = 'kritika';
 $con = mysqli_connect($HostName,$HostUser,$HostPass,$DatabaseName);
 $name = $_POST['name'];
 $ans1 = $_POST['que1'];
 $ans2 = $_POST['que2'];
 $ans3 = $_POST['que3'];
 $ans4 = $_POST['que4'];
 $ans5 = $_POST['que5'];
 $ans6 = $_POST['que6'];
 $ans7 = $_POST['que7'];
 $ans8 = $_POST['que8'];
 $ans9 = $_POST['que9'];
 $ans10 = $_POST['que10'];
  $Sql_Query = "UPDATE student SET
name='$name',que1='$ans1',que2='$ans2',que3='$ans3',que4='$ans4',que5='$ans5',que6='$ans6',que7='$ans7',que8='$ans8',que9='$ans9',que10='$ans10' where name='$name' ";
 if($con->query($Sql_Query) === TRUE){
 echo 'Data Inserted Successfully';
 }
 else{
 echo "ppp";
 }
 mysqli_close($con);
 ?>
Run the application :
Now, connect your phone to computer via USB cable (data cable). At last, you have to run the app by clicking the green “Run” button in the Android Studio IDE. After that, the app will be installed and launch on your device (phone). You can see your app on a phone like below image.

Conclusion :
After completing this article, you have learned how to build dynamic MCQ app with local server (wampServer) connectivity using Android Studio IDE. After that, you can build more complex learning app using Android Studio which connect with any type of server like remote server (VPS). Thank you for visiting my site.